In Arduino digitalWrite() and analogWrite() functions are used to take output from Arduino. In brief, digitalWrite() function turns any I/O pin high or low and analogWrite() function gives analog output at any of Arduino’s PWM (pulse width modulation) pin. Arduino gives analog output in the form of PWM. We will discuss about it later.
Arduino buying links
| Amazon link for India | Amazon link for other countries |
Table of Contents
Arduino digitalwrite function
This function gives a digital output at any I/O pin. It takes pin number and state of that pin number (that we want to be at output) as input parameter. Arduino UNO has 14 input/output pins out of which we can choose any pin as input or output once at a time. To choose any I/O pin as output, we have to just define it using pinMode() function. pinMode() function takes two parameter- pin number and pin type (INPUT, OUTPUT or INPUT_PULLUP). INPUT_PULLUP also sets the pin as input but it also sets internal pullup resistor which keep that pin pulled high.
int LedPin = 2; // digital pin 2 has a LED with attached to it.
void setup() { // the setup routine runs once when you press reset
pinMode(LedPin, OUTPUT); // make the pushbutton’s pin an input
}
void loop(){ // the loop routine runs over and over again forever
}
In this code we have first assigned an integer type variable “LedPin” to 2 (which will be our output pin number) as then in the void setup block we have defined LedPin as output pin. That means we have defined pin number 2 as output. Now let’s see the code using which we can turn the pin number 2, high and low.
int LedPin = 2;               // digital pin 2 has a LED with attached to it.
void setup() {                  // the setup routine runs once when you press reset
  pinMode(LedPin, OUTPUT);      // make the pushbutton's pin an input
}
void loop(){            // the loop routine runs over and over again forever
digitalWrite(LedPin,HIGH);      // turning pin 2 high
delay(1000);            // waiting for a second
digitalWrite(LedPin,LOW);       //turning pin 2 low
delay(1000);            // waiting for a sec.
}
In void loop block we have turned pin number 2 (LedPin) high, waited a second (during this period, pin 2 will be still high), then turned it low and waited a second (during this period, pin 2 will be still high). This pin number 2 will be high for a second and low for a second.
Arduino analogWrite function
Arduino UNO has 6 PWM pin on board. Using these pin we can take analog output from Arduino. We can dim the brightness of LED. As mentioned before that PWM is responsible for analog output from Arduino. Let’s see what PWM is?
PWM (pulse width modulation)
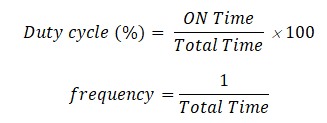
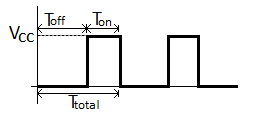
PWM stands for “pulse width modulation”. In PWM we switch rapidly any circuit between 0 volt and high (5 volt in the case of Arduino) voltage. By changing the “ON” and “OFF” time period, we can achieve different voltages this time period is called duty cycle. For example if “on” time is equal to “off” time then the duty cycle will be 50% and voltage will be 2.5 volt. Let’s understand it graphically.
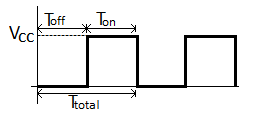
Where:
VCC = ON state voltage
TON = ON time
TOFF = OFF time
TTotal = Total time period
If duty cycle is 50% and VCC is 5 volt then average voltage will be
VAVG = 5 volt×50% = 2.5 volt
If duty cycle is 25% and VCC is 5 volt then average voltage will be
VAVG = 5 volt×25% = 1.25 volt
In Arduino we can define the analog output voltage using an 8 bit number from 0 to 255. Where 0 means 0 volt and 255 means 5 volt. That means we have 28 = 256 different voltage level from 0 to 5 volt to define so minimum voltage step will be around 20mV. So, we can change voltage on any PWM pin by minimum 20mV. This means that we can define the duty cycle of the PWM signal with a number from 0 to 255, where 0 means 0% and 255 means 100%.
Now come to the Arduino code and see how we can use analogWrite function in the code. This function takes two arguments which are output pin number (we can use only PWM pins here) and the analog value from 0 to 255. According to passed parameters it gives analog voltage output at a pin number.
void setup() {          // put your setup code here, to run once:
  }
void loop() {           // put your main code here, to run repeatedly:
  analogWrite(3,128);     // it will give 2.5 volt at digital pin 3
  delay(50);                     // delay for stability
}
In the void setup block you can define the pin 3 as output using pinMode but we don’t need. In the void loop section we have used analogWrite function and given it pin number 3 and analog value 128 as parameter. It will give 2.5 volt output at pin number 3.
Write analog voltage in Arduino
If you are working with analogWrite in Arduino then you wouldn’t want to write the number from 0-255 for taking analog voltages sometimes. Instead you would want to write the actual voltage we want on the PWM pin. Then you have to do some calculation to find the analog value (0-255) using analog voltage we want. To find the number from 0 to 255 corresponding to any voltage, you have to divide the analog value to the 5 volt and multiply it by the voltage we want from analog output. You wouldn’t want to do it yourself when Arduino can do this calculations very easily. Let’s see how?
void setup() {                // put your setup code here, to run once:
Serial.begin(9600);     // initializing the serial communication
}

void loop() {           // put your main code here, to run repeatedly:
  float voltage= 2.58;  // put your voltage here that you want at output (from 0 to 5 volt):
  int analogValue;      // for storing number from 0-255
  analogValue=(255/5)*voltage;  //calulating analog value
  Serial.println(analogValue);  // serial printing the analog value
  analogWrite(3,analogValue);    // giving analog output at digital pin 3
delay(50);
}
Here we have declared a float type variable “voltage”. This float variable can store double precision floating point numbers. In this variable we have stored the voltage that we want at output. And then we have done our calculation and stored the result in a integer type variable “analogValue”. Then we have serial printed the result and used the function analogWrite to output that voltage. Here is the output of this code in serial monitor.
Now serial monitor is showing the analog value that we have calculated. This number is passing as duty cycle parameter for analogWrite function and giving 2.58 volt at pin 3.