Operators are very important for any programming language. It is basically a symbol that performs any mathematical or logical operations. As we know that Arduino programming is similar to C programming. C language provides these operators.
- Arithmetic operators
- Relational (comparison) operators
- Bitwise operators
- Boolean (Logical) operator
Arduino buying links
| Amazon link for India | Amazon link for other countries |
Let’s see what does these operator do?
Table of Contents
Arithmetic operators
These operators perform mathematical operations like addition, subtraction, multiplication, division etc.
| Operator name | Operator symbol |
| Assignment operator | = |
| Addition operator | + |
| Subtraction operator | – |
| Multiplication | * |
| Division | / |
| Modulo operator | % |
| Increment operator | ++ |
| Decrement operator | — |
Assignment operator
Assignment operator assigns the value which is on right side of the “=” to the variable which is on left side. Let’s see an example. After assigning process value of both operands are same.
int a;                  // declaring a as integer
int b;                  // declaring b as integer
void setup() {          // put your setup code here, to run once:
  Serial.begin(9600);   // initializing serial communication
  a=20;                 // assigning 20 to a
  b=10;                 // assignig 10 to b
  Serial.println(a);    // serial printing the value of a
  Serial.println(b);    // serial printing the value of b
  b=a;                  // assigning the value of a to b
  Serial.println(b);    // serial printing the value of b
}
void loop() {
  // put your main code here, to run repeatedly
}
In this code first we have declared a and b as integer data type. Then in the void setup block we begin the serial communication. In the next line we assigned 20 to the variable ‘a’ and 10 to variable ‘b’. Then we serial printed the value of ‘a’ and ‘b’. Then after we assigned the value of ‘a’ to the ‘b’ and serial printed it. Let’s see the output on serial monitor.
So, as you can see that Arduino has serial printed the value of ‘a’, ‘b’ and ‘b’ after assigning value of ‘a’ to it respectively. Now let’s see other arithmetic operators quickly.
Addition, subtraction, multiplication and division operators
These operators perform mathematical calculation as their name suggests. See this code.
int a;
int b;
int c;
void setup() {          // put your setup code here, to run once:
  Serial.begin(9600);   // initializing serial communication
  a=20;                 // assigning 20 to a
  b=10;                 // assigning 10 to b
  c=a+b;                        // adding a and b and assigning the addition to c
  Serial.println(c);    // serial printing the value of c after addition
  c=a-b;                        // subtracting b from a and assigning it to c
  Serial.println(c);    // serial printing the value of c after subtraction
  c=a*b;                        // multiplying a and b and assigning it to c
  Serial.println(c);    // serial printing the value of c after multiplication
  c=a/b;                        // dividing a from b and assigning it to c
  Serial.println(c);    // serial printing the value of c after division
}
void loop() {
  // put your main code here, to run repeatedly:
}
Now let’s see the output of this code.
As you can see that Arduino has printed the addition, subtraction, multiplication and division of 20 and 10 respectively on serial monitor.
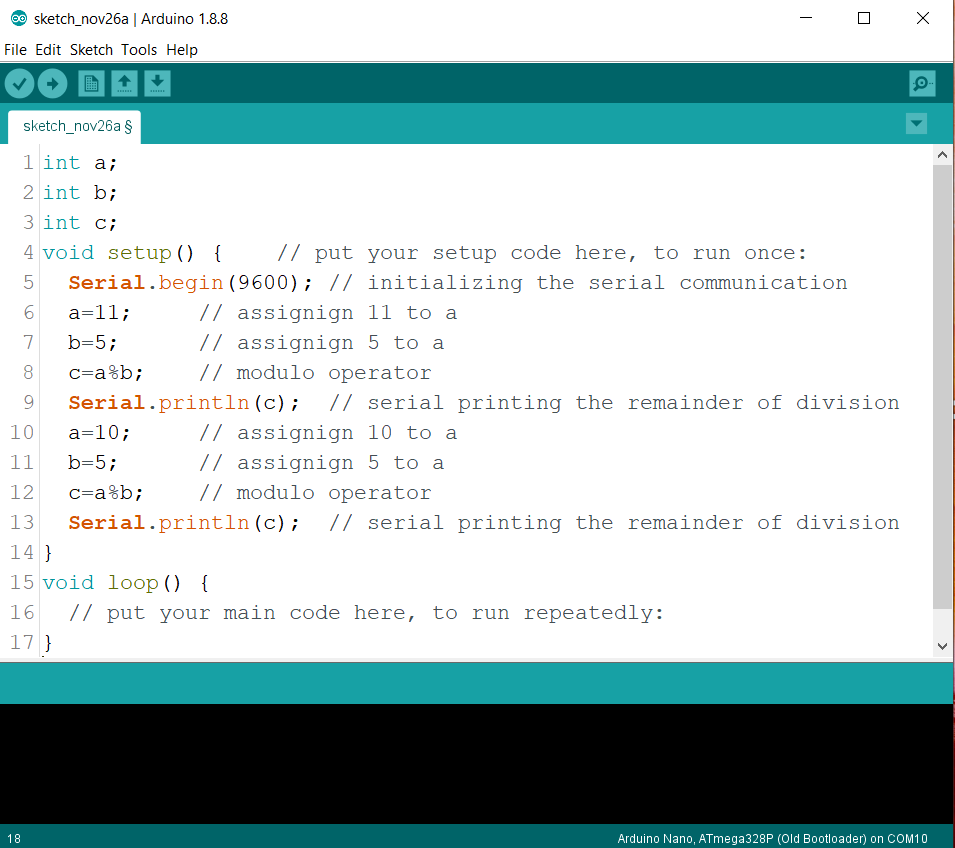
Modulo operator
This operator gives the remainder of any division.
int a;
int b;
int c;
void setup() {          // put your setup code here, to run once:
  Serial.begin(9600);   // initializing the serial communication
  a=11;                 // assignign 11 to a
  b=5;                  // assignign 5 to a
  c=a%b;                // modulo operator
  Serial.println(c);    // serial printing the remainder of division
  a=10;                 // assignign 10 to a
  b=5;                  // assignign 5 to a
  c=a%b;                // modulo operator
  Serial.println(c);    // serial printing the remainder of division
}
void loop() {
  // put your main code here, to run repeatedly:
}
First we have divided 11 from 5, so it will give 1 as remainder and then we have divided 10 from 5, so it will give 0 as remainder. So, let’s check the answer.
Suppose we want to performs this operation “B = B + A”. Then we can also write it like this “B+=A”. Similarly we can write-
A = A + 2 as A+=2
A = A – 2 as A-=2
A = A * 2 as A*=2
A = A / 2 as A/=2
A = A % 2 as A%=2
These operators (+=, -=…) are known as compound operator in Arduino.
Increment and decrement operators
Increment operator increments the value of any number and decrement operator decrements the value of any number.
There are two types of increment or decrement operator.
- Post increment or decrement operator: – This operator comes after any variable. This operator first performs other operation then increments or decrements. For example suppose we are adding a and b and we have post incremented the b. So, as mentioned first it will be added to a then it will increment.
int a;
int b;
int c;
void setup() {          // put your setup code here, to run once:
  Serial.begin(9600);   // initializing the serial communication
  a=11;                 // assignign 11 to a
  b=5;                  // assignign 5 to a
  c = a + b++;
  Serial.println(c);    // serial printing the addition
  Serial.println(b);    // serial printing the value of b
  a=10;                 // assignign 10 to a
  b=5;                  // assignign 5 to a
  c = a + b--;          // modulo operator
  Serial.println(c);    // serial printing the subtraction
  Serial.println(b);    // serial printing the value of b
}
void loop() {
  // put your main code here, to run repeatedly:
}
Output: 16
6
15
4
- Pre increment or decrement operator:- This operator comes before the variable like “++b or –b”. This operator first increments or decrement and then performs other operation. For example suppose we are adding a and b and we have pre incremented the b. So, as mentioned first it will increment then it will be added to a.
int a;
int b;
int c;
void setup() {          // put your setup code here, to run once:
  Serial.begin(9600);   // initializing the serial communication
  a=11;                 // assignign 11 to a
  b=5;                  // assignign 5 to a
  c = a + ++b;
  Serial.println(c);    // serial printing the addition
  Serial.println(b);    // serial printing the value of b
  a=10;                 // assignign 10 to a
  b=5;                  // assignign 5 to a
  c = a + --b;          // modulo operator
  Serial.println(c);    // serial printing the subtraction
  Serial.println(b);    // serial printing the value of b
}
void loop() {
  // put your main code here, to run repeatedly:
}
Output: 17
6
14
4
Calculator on serial monitor using Arduino
We will see the example of a calculator on serial monitor using Arduino. In this serial monitor calculator we can perform addition, subtraction, multiplication and division. We have to just two operand as input. After giving these input addition, subtraction, multiplication and division will be shown in the serial monitor. Let’s see the snapshot of serial monitor of that calculator first.
As you can see that we have given two numbers as using serial monitor. First number is labeled as ‘a’ and we have assigned it 15 and second number is labeled as ‘b’ and we have assigned it 5.
Addition, subtraction, multiplication and division is shown below as result. Now let’s see the code for it.
int a = 0;
int b = 0;
void setup() {
  Serial.begin(9600);

}

void loop() {
  //Taking first number as input
  Serial.print("enter the first number(a):");
  while (1)
  {
    if (Serial.available() > 0)
    {
      a = Serial.parseInt();
      break;
    }
  }
  delay(100);
  Serial.println(a);
  Serial.read();                    // clear the serial buffer
  //Taking second number as input
  Serial.print("enter the second number(b):");
  while (1)
  {
    if (Serial.available() > 0)
    {
      b = Serial.parseInt();
      break;
    }
  }
  delay(100);
  Serial.println(b);
  Serial.read();                  //clear the serial buffer
  // Performing the arithmetic operation
  Serial.println();              // spacing
  Serial.println();
  Serial.print("Addition (a+b):");
  Serial.println(a + b);
  Serial.print("Subtraction (a-b):");
  Serial.println(a - b);
  Serial.print("Multiplication (axb):");
  Serial.println(a * b);
  Serial.print("Division (a/b):");
  Serial.println(a / b);
}
So this is the code that should be uploaded on the Arduino board in order to function it as that calculator that we have previously described. Now let’s understand the code line by line.
First we have declared two variable ‘a’ and ‘b’ for storing the number that we will give through serial monitor. Then in void setup function we have initialized the serial communication at the 9600 baud rate. Which will allow us to serially send or receive data.
In the void loop function we have printed the instruction to enter first number. Then we have started a infinite while loop that will continuously check if any input has registered. If any input has registered then if block will be activated and it will assign the serial data as integer to ‘a’. Here Serial.parseInt will convert the ASCII code into integer. Because serial communication uses ASCII code to communicate. After that we have broke the infinite while loop using break statement.
Then we put some delay, printed ‘a’ and started new line. Here serial.read function is used to clear the serial buffer for next input. Then we have repeated the same process for taking second input.
After that we have used serial print method to add some space in serial monitor. Then we have printed “Addition (a+b):”. We have done this for labeling purpose. Then we have printed the addition of a and b on serial monitor and started a new line. We have repeated this process to perform subtraction, multiplication and division also.