In previous two tutorials we have discussed about arithmetic and relational operator. There are following types of operator.
- Arithmetic operators
- Relational (comparison) operators
- Bitwise operators
- Boolean (logical) operator
Arduino buying links
| Amazon link for India | Amazon link for other countries |
In this tutorial we will see about bitwise operators.
Table of Contents
Bitwise operators
Bitwise operators performs bitwise logical operation between two operands (numbers). Let’s see first that what a bitwise logical operation is.
Suppose we have two numbers 124 and 132. If we perform any logical operation then this operation will be performed to its entire binary bit equivalent to that number. So let’s first convert both decimal numbers we have assumed into binary numbers.
(124)10 = (0111 1100)2 and (132)10 = (1000 0100)2
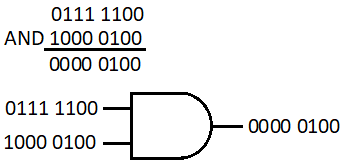
Now suppose we want to perform bitwise AND between those numbers. As we know that in AND gate if both inputs are 1 then only the output will be 1. In this AND operation first we have 0 AND 0 and this will give us 0 then we have again 0 AND 0 so output will be 0. At third bit we have 1 AND 1 and this will give us 1 and all other bits will be 0. So our number is 0000 0100, and this is 4 in decimal. So, if we perform bitwise AND between 124 and 132 we should get 4 as output.
Now let’s see the bitwise OR operation.
We know that in OR gates even one input is 1 then output of the OR gate will be 1. So, wherever there is 1 in even one number, it will be present in output result. So, output of 124 (0111 1100) OR 132 (1000 0100) will be (1111 1100) which is 252 in decimal.
There are following bitwise operation that we can perform.
| Operator name | Operator symbol |
| Bitwise AND | & |
| Bitwise OR | | |
| Bitwise NOT | ~ |
| Bitwise XOR | ^ |
| Bitwise left shift | << |
| Bitwise right shift | >> |
Bitwise AND
We have seen an example about bitwise AND. Now let’s see an example Arduino code of the bitwise AND operation.
int a;                      // to store the result
void setup() {          // put your setup code here, to run once:
  Serial.begin(9600);   // initializing the serial communication
  a=124&132;                // performing bitwise AND between 124 and 132
  Serial.println(a);    // serial printing the result
}
void loop() {
  // put your main code here, to run repeatedly:
}
Output: 4
As you can see that we have got the result which we have calculated before.
Bitwise OR
We have also seen an example about bitwise OR. Now let’s see an example Arduino code of the bitwise OR operation.
int a;                 // to store the result
void setup() {          // put your setup code here, to run once:
  Serial.begin(9600);   // initializing the serial communication
  a=124|132;            // performing bitwise OR between 124 and 132
  Serial.println(a);    // serial printing the result
}
void loop() {
  // put your main code here, to run repeatedly:
}
Output: 252
As you can see that we have got the result which we have calculated before.
Bitwise NOT
In bitwise NOT we don’t need two numbers since we know that NOT gate have only one input and one output. It just inverts all the bits of just one number. Let’s see an example.
Assume we have a number 123 and we want to perform the bitwise NOT to this number. This will invert all the bits of that number.
Binary equivalent of 123 will be 0111 1011 and after performing the bitwise NOT then it will be inverted like this 1000 0100. That is 132 in decimal.
Let’s see an example Arduino code of the Bitwise NOT.
byte a;                       // to store the result
void setup() {          // put your setup code here, to run once:
  Serial.begin(9600);   // initializing the serial communication
  a=~124;               // performing bitwise NOT on 123
  Serial.println(a);    // serial printing the result
}
void loop() {
  // put your main code here, to run repeatedly:
}
Output: 132
Here we have taken the byte type variable to store the result because if we had taken integer data type then it would given us negative number. Because sign bit (Which is MSB in binary) will be also inverted.
Bitwise XOR
This operator will do exactly what a XOR gate will do. It will also take two numbers. To understand the operation of XOR operator, first we have to see the truth table of the XOR gate.
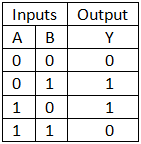
This is the truth table of XOR gate. Now assume two numbers 125 and 126. We have to perform the bitwise XOR between both numbers. Binary equivalent to 125 is 0111 1101 and 126 is 0111 1110. Now perform the XOR operation on every bit according to truth table. That will give us 0000 0011, that is 3 in decimal.
int a;                   // to store the result
void setup() {          // put your setup code here, to run once:
  Serial.begin(9600);   // initializing the serial communication
  a=125^126;            // performing bitwise XOR between 125 and 126
  Serial.println(a);    // serial printing the result
}
void loop() {
  // put your main code here, to run repeatedly:
}
Output: 3
This operator is mostly used to toggle a bit. As you can see from truth table, output is exactly same as B input if A input is zero but when A input is 1 then output will be reverse of whatever input is applied on B input. That means if we XOR any bit from 1, it will be inverted at every time it is executed. Let’s see an example.
 int a=0;             //to store the result
void setup() {          //put your setup code here, to run once:
  Serial.begin(9600);   //initializing the serial communication
  a=a^1;                //performing bitwise XOR between a and 1
  Serial.println(a);    //serial printing the result
  a=a^1;                //performing bitwise XOR between a and 1
  Serial.println(a);    //serial printing the result
}
void loop() {
  // put your main code here, to run repeatedly:
}
Output: 1
0
We have initialized the variable ‘a’ with 0 an then we have performed XOR operation between ‘a’ and so it will be 1 and we have serial printed the ‘a’. Now ‘a’ is 1 and again we are performing the XOR operation. So it will be 0 again. This way ‘a’ is toggling between 0 and 1.
Bitwise left shift
This operator shifts the bits of any number to left. It shifts the bits according to argument passed to it. We give the number left side of “<<” symbol which we want to be shifted and on right side we give the number that tells the operator how many times we want to shift the number. For example we have a number 231 and we want to left shift it 1 time. We will right it as 231<<1.
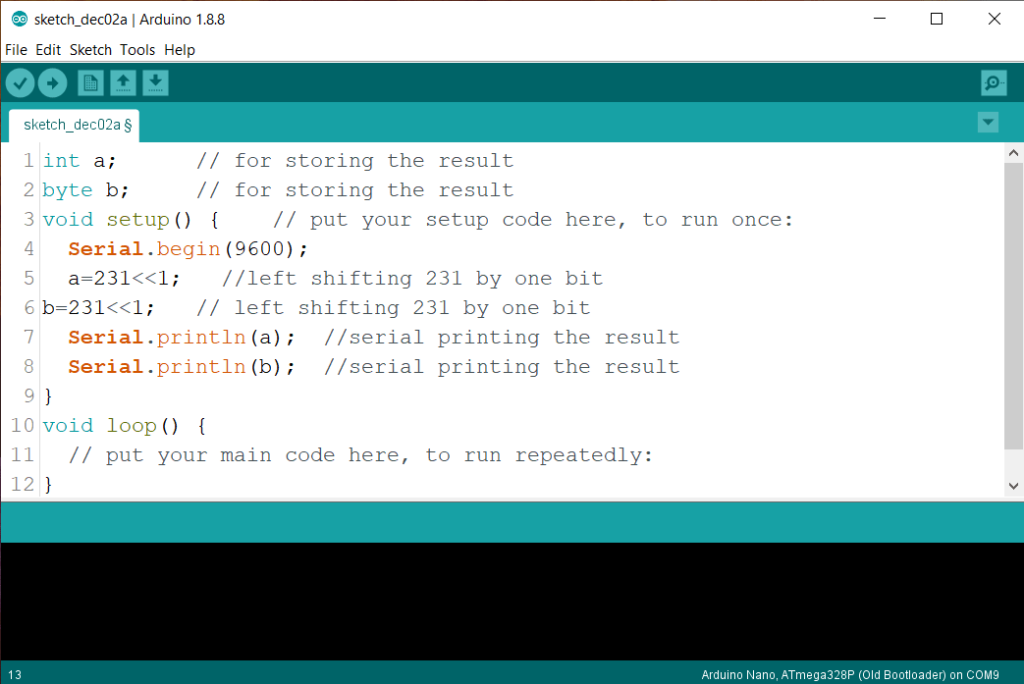
Binary equivalent of 231 is 1110 0111, and we want it left shifted by one bit then output will be 1 1100 1110. Which is 462 in decimal. We will get this result if our data type is integer (int). But if our data is byte type then MSB of our number will fall off at every bit shift and we will get only 8 bit number which is 1100 1110 and that is 206 in decimal. Let’s see an example Arduino code.
int a;                   // for storing the result
byte b;                 // for storing the result
void setup() {          // put your setup code here, to run once:
  Serial.begin(9600);
   //initializing serial communication
  a=231<<1;               //left shifting 231 by one bit
  b=231<<1;               // left shifting 231 by one bit
  Serial.println(a);    //serial printing the result
  Serial.println(b);    //serial printing the result
}
void loop() {
  // put your main code here, to run repeatedly:
}
Output: 462
206
Bitwise right shift
This operator shifts the bits of any number to left. It takes argument as same as the left shift. For example we have a number 241 and we want to right shift it 1 time. We will right it as 241>>1.
Binary equivalent of decimal number 241 is 1111 0001. We want it right shift by one bit so it will be shifted like this 0111 1000, which is 120 in decimal. So LSB of the number will fall off every time when number is right shifted. Here we don’t have issue of getting different answers from different data types.
int a;                      // for storing the result
byte b;                 // for storing the result
void setup() {          // put your setup code here, to run once:
  Serial.begin(9600);
  a=241>>1;               //right shifting 241 by one bit
b=241>>1;         // right shifting 241 by one bit
  Serial.println(a);    //serial printing the result
  Serial.println(b);    //serial printing the result
}
void loop() {
  // put your main code here, to run repeatedly:
}
void loop() {
// put your main code here, to run repeatedly:
}
Output: 120
120
As you can see that we have got same answer in both data types.
wonderful and also remarkable blog site. I actually wish to thanks, for
offering us better information.
It¦s really a great and useful piece of information. I¦m glad that you just shared this useful information with us. Please keep us up to date like this. Thanks for sharing.