Table of Contents
Introduction
I have introduced you with the ESP8266 Wi-Fi module in one of my previous article. It is a small module that makes a normal microcontroller to connect to the internet. By connecting to an access point (router, mobile network etc.) it can request or send data from/to a server (website). It can also work like a server and serve webpages on local area network (on same network). ES8266 can also be configured as access point and devices can connect to it as WIFI router. It work as 3 modes: Station or client mode, SoftAP (soft access point) mode and both. In station or client mode it can connect to a access point and send or receive data to/from webserver or it can work like a server itself. Through it’s IP address we can request a connection and access webpages. In softAP mode this device can work like a router to which devices can connect and work as can request data from ESP8266. In this you will see the AT commands list for ESP8266-01 or ESP-01 board and understand about its function.
AT command is the instruction for the ESP8266 that we give to the module from the host device. Through this AT command host devices such as Arduino or other microcontroller can communicate with the module. This communication happens serially between host and ESP8266. In case where you want to send the command from computer to the module then you need a USB to serial converter like FTDI TTL to USB converter. It is a device that converts USB protocol to serial protocol and vice versa. First let’s see the connection that you need to complete to communicate between computer and ESP8266 module.
ESP8266 connection to run AT commands
As discussed earlier that ESP8266-01 send or receive command in serial communication protocol but computer send or receive data via USB. Both are different protocols of data transferring. So we have to add a mediator device which can convert serial data to USB data and send to computer through USB cable and USB data to serial data which ESP-01 module can understand. That device is FTDI TTL to USB converter. Let’s see the connections.
This is the FTDI TTL to USB converter. Now let’s see the connections of ESP8266. Here top most pin is ground pin and third pin is VCC which are power lines for the device (ESP-01). Second pin is the CTS which stand for clear to send. We will not use this pin in this circuit. 4th and 5th pin is TX and RX which will connect to RX and TX of the ESP-01 module respectively. Last pin is DTR which stands for the data terminal ready. This pin also not used in this circuit. Now lets see the connections.
This connection is now complete. You can plug an USB cable and start communicating with your computer. We have only completed the hardware end. Now come to computer end and see what tools and software we need to get started. Our computer by default don’t support serial communication so computer will not recognize incoming data from FTDI device. So we need some kind of driver which can read incoming data pattern. You can use any serial terminal. I will recommend you to use “PuTTy” as it is easy to use and has many other features.
In case you don’t have FTDI TTL to USB converter you can use Arduino board as replacement of FTDI device. Connection is shown below.
If you are using Arduino as serial converter then you need Arduino IDE as serial software.
Connect everything together
Now plug the hardware to the computer using an USB cable. We need the port number to communicate with ESP8266 using PuTTy software. To find port number assigned to FTDI we need to open device manager on computer. Then go to ports option and see the ports number assigned to FTDI TTL to USB converter or Arduino board.
I am using the Arduino board as serial to USB converter so I will open Arduino IDE and go to serial monitor. Then choose the 115200 baud rate and “Both NL and CR” options . Here NL is new line “\n” and CR is carriage return “\r”. If you choose this option serial monitor will add those values to your command and if you don’t then you have to manually type it at last of every command.
Now type AT to check whether ESP-01 is responding or not. If module responds with “OK” then you have done everything perfect and you are good to go. But if it responds with “ERROR” then you need to check your syntax that it should not contain any space or any other character, Just “AT”. If module doesn’t reply anything then you need to check your connection. Module should be powered with 3.3v. For that FTDI converter has a 3.3v jumper and Arduino comes with 3.3v power output.
ESP8266 AT commands list
Here are the list of all AT commands that a ESP8266 supports. You can see that there are 5 columns in the table. First column is for description and second column is for syntax. In the syntax there are the variables after the “=”, don’t think it as actual value. You can change the variable according to your data. Parameter is for instruction for you to the change the syntax variable according to your need. Query column contains the command that runs as query. Query response column tells the output of that query.
| Description | Syntax | Parameters | Query | Query response |
|---|---|---|---|---|
| AT+GMR | Get the version | |||
| Reset the module | AT+RST | None | ||
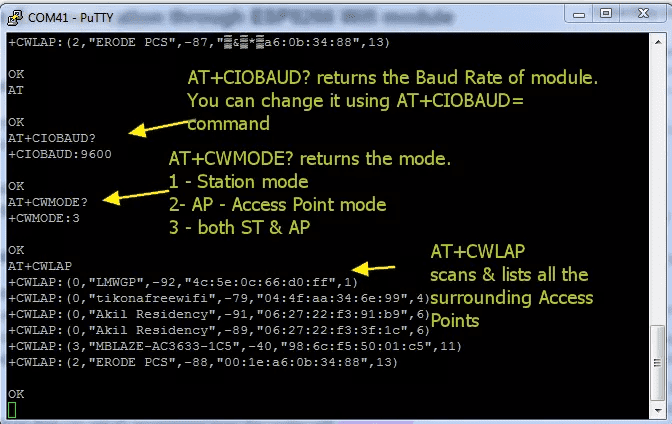
| WIFI mode | AT+CWMODE=mode | mode = 1,2,3: 1 for station mode, 2 for access point mode and 3 for both mode at the sa | AT+CWMODE? | Gives the current WIFI moder |
| Join an access point (WIFI) | AT+CWJAP=”ssid”,”pass” | ssid= wifi name, pass = wifi password | ||
| List all available network | AT+CWLAP | None | ||
| Quit the access point | AT+CWQAP | None | ||
| Set the name and password of ESP8266 | AT+CWSAP=”ssid”,”pass”,ch,encr | ssid = ESP-01 name, pass = Password, ch = channel ID, encr = encryption encr = 1 () |
AT+CWSAP? | Current AP parameters |
| Get IP address | AT+CIFSR | None | ||
| Connection status | AT+CIPSTATUS | None | ||
| Set multiple connection | AT+CIPMUX=conntype | conntype =0 (for single connection) conntype =1 (for multiple connection) |
AT+CIPMUX? | current connection type |
| Start TCP or UDP connection | 1)single connection (+CIPMUX=0) AT+CIPSTART=”type”,”addr”,port 2) multiple connection (+CIPMUX=1) AT+CIPSTART=id,”type”,”addr”,port |
id = connection ID type = TCP/UDP addr = web address port = port |
AT+CIPSTART=? | Returns the current connection |
| Send data | 1)single connection (+CIPMUX=0) AT+CIPSEND = character length 2) multiple connection (+CIPMUX=1) AT+CIPSTART=id, |
Character length = number of character you want to send | ||
| Close TCP or UDP connection | 1)single connection (+CIPMUX=0) AT+CIPCLOSE 2) multiple connection (+CIPMUX=1) AT+CIPCLOSE=id |
id = connection ID | AT+CIPCLOSE=? | Return the ID’s of connection which are closed |
| Set ESp8266 as server mode | AT+CIPSERVER=mode,port | mode = 0 (to close the server) or 1 (to start server) port=port |
Now let’s run some command and see the output as example.
Run AT Commands on ESP8266
Now I am going to run some AT commands on ESP8266 from the list to demonstrate you.
ESP8266 AT+RST
I will first run the reset command to reset the board. Let’s see the output.
You can see that it this AT command resets the module and prints its version and hardware details.
AT+GMR (Get AT firmware version)
Now let’s see the the version of AT command firmware of ESP8266.
As you can that this command printed the AT version, SDK version, manufacturer and AT version compile date and time.
AT+CWMODE (Set the WIFI mode of ESP8266)
Now let’s see how you can set the WIFI mode of ESP8266.
Here I have set the WIFI mode on 3 that means it can work as access point and station both at same time. This helps a lot in creating network mesh for industrial applications.
I was extremely pleased to uncover this page. I want to to thank you for your time due to this wonderful read!! I definitely savored every little bit of it and i also have you book marked to look at new things in your site.