I2C or IIC has become more popular nowadays for short-distance communication. I2C stands for the inter-integrated circuit. You can know it also as a two-wired interface (TWI) because you can communicate with various devices using just two wires. This two wires bus is used for serial communication between host and slave devices. Philips Semiconductor developed this i2c or iic protocol of communication. You can interface various types of sensors, devices using i2c. But in this tutorial, I am going to explain to you how you can control an LCD using the i2c technique with the help of Arduino.
Table of Contents
Working of I2C protocol
As said before, i2c communication happens between multiple devices using just two wires. Those wires are the SCL and SDA. SCL line carries the clock signal for serial communication and SDA line carries the data from slave to master, master to slave, or slave to slave. But how it can be possible to communicate more than two devices with just two wires. Actually, in this communication protocol, every device has its address. If the master has to communicate with one of the connected devices then it will send the address of that device and that device sends an acknowledgment back to the master.
i2c communication protocols (data frames)
To start the i2c communication master send the start bit on the bus. So, all devices on that bus are now ready to read the data coming from the master. After the start bit, the master sends the data in a sequence of 8 bits. The First 8 bits after the start bit is the data address that slave with whom the master wants to communicate. From that 8 bit, only first 7 bits are the address and the last bit (LSB) is the read/write signal. So there can be up to 128 different devices using a 7-bit address. But in the case of Arduino, addresses from 0x00 to 0x07 are reserved so there can be 120 i2c devices (120 LCD is a huge number of displays) with the Arduino.
After the master sent the address, a particular device on that address will send an acknowledgment to the master. Then the master will read or write data from/to that device. The slave device has to send an acknowledgment after every data transfer. The slave device does this by pulling down the SDA line. After reading or writing data, the master will send a stop bit.
Advantages of i2c coummnunication
- There can be more than one master
- It is less complex as it uses only two wires
- Less costly
- Error handling capabilities with ACK signal
Limitations of i2c communication
- Slow speed (upto 400kbps)
- half duplex (means communication can happen bi-directional but not simulateneously)
I2C LCD connectin with arduino
Now take a look at the Arduino connection with the i2c LCD. As you know we need SCL and SDA lines for the i2c communication. Arduino has a built-in i2c port whose SCL is on A5 and SDA is on A4.
16×2 LCD doesn’t support the i2c communication as default. So you have to add a device (IC) that can communicate to Arduino in the i2c protocol and encode/decode the i2c data. In our case, I have used the PCF8574. This is an 8-bit i/o expander for the i2c bus. That means it can decode i2c data and give it on its 8 input-output pins and it can encode inputs to the i2c protocol.
As you can see, LCD is in 4-bit mode. That means only the last 4 data pins of LCD are connected to the i2c port. In this configuration, you give LCD command or character data in parts (in 4-4 bits).
PCF8574 has three address lines. So it can have 8 different addresses and you can connect up to 8 devices. PCF8574 addressing starts from 0x20 and as you can see all address lines are low. So the address of the LCD will be 0x20.
I2C LCD with arduino code
Now come to the programming part. You will need two Arduino libraries to control an LCD using i2c. The first one is the Wire.h and the second one is the LiquidCrystal_I2C.h. You can install those by going on sketch in the menu and selecting include library then click on manage libraries
Then a new window will appear and you have to search the library and install it.
Now take a look at the code.
#include
#include

LiquidCrystal_I2C lcd(0x20,16,2);  //0x20 is the address of a 16 chars and 2 line display

void setup()
{

  lcd.init();                      // initialize the lcd

  // Backlight on the LCD.
  lcd.backlight();


  // Print a message to the LCD.
  lcd.print("ELECTRONICS-FUN.");
  lcd.setCursor(0,1);             //Begining of second line
  lcd.print("COM");

}


void loop()
{


}
This is how simple the code is. Now have a look at the output.
Multiple I2C LCDs with Arduino
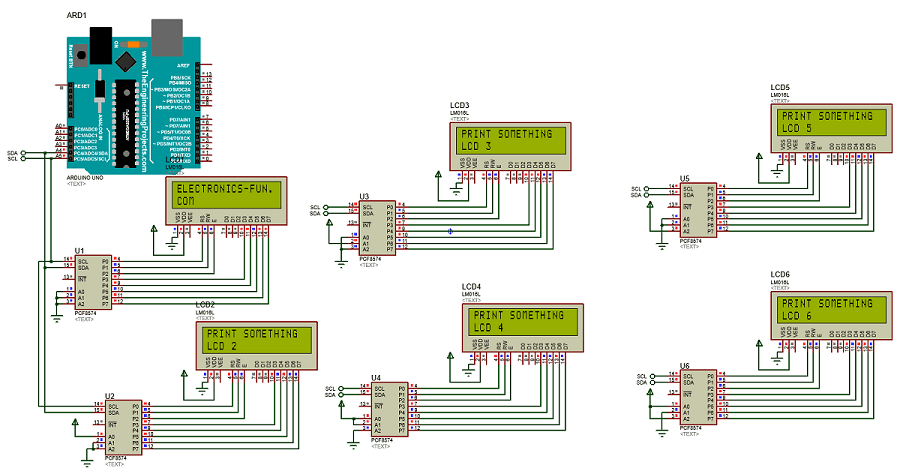
As said earlier, you can connect more than one slave device with the i2c bus. You just have to choose a unique address for that device. Now I will connect one more i2c LCD with Arduino and print something on it. Let’s see the hardware configuration to connect one more LCD.
As you can see I have connected one more i2c LCD. In this LCD I have changed the address. Now the A0 of the PCF8574 IC is connected to VCC so it A0 is now high. So the address of the second LCD will be 0x21. Now let’s see how you can control the second LCD.
#include
#include

LiquidCrystal_I2C lcd(0x20,16,2);   //0x20 is the address of first 16 chars and 2 line display
LiquidCrystal_I2C lcd2(0x21,16,2);  //0x21 is the address of second 16 chars and 2 line display

void setup()
{

  lcd.init();                       // initialize the lcds
  lcd2.init();

  // backlight on the LCD.
  lcd.backlight();
  lcd2.backlight();


  // Print a message to the LCDs.
  lcd.print("ELECTRONICS-FUN.");
  lcd.setCursor(0,1);
  lcd.print("COM");

  lcd2.print("HELLO WORLD!");

}


void loop()
{
}
This is the output on proteus.
Conclusion
In this tutorial, you have learned how the i2c communication protocol works. How do you connect an LCD to an i2c bus on Arduino and control it? At last, you have learned how you can control multiple LCDs using the i2c protocol.
I am sure this paragraph has touched all the internet viewers, its really really nice post on building up new webpage.