To make a useful Arduino (any other microcontroller) project you will sometimes need one or more sensors. Even the human body also has five sensors (senses), which are the eye, nose (smell), ear, tongue, and skin (touch). Through these senses, we give the data to our mind and our mind takes action according to real-world conditions. You can take it as same in the case of Arduino and sensors. A sensor gives the data about the outer atmosphere to Arduino. In this article, I made a list of some useful sensors and explained how to interface them with Arduino or any other microcontroller.
Table of Contents
List of Arduino sensors on their working basis
I will first categorize the sensor based on their working bases such as light or sound. Then I will discuss the different types of sensors and variations among them in that category. Here are the different categories.
| Working basis | Examples |
|---|---|
| Light | Light-dependent resistor, IR related sensors |
| Sound | Microphone, Ultrasonic sensor, etc. |
| Temperature (environmental) | Thermocouples, Humidity sensor, Thermistor, etc. |
| Position | A rotary encoder, Potentiometer |
| Magnetic | Hall effect sensor |
| Electrostatic | Accelerometer, Human touch sensor |
Now let’s look at the different types of sensors in each category.
Light related sensors
In this category, you have plenty of sensors. I will explain some very useful sensors, their working, and interfacing.
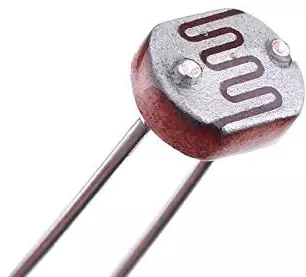
Light-dependent resistor (LDR)
This is a special type of resistor whose resistance varies according to light which incidents to it. LDR is a very useful sensor where you have to perform any action based on light. Such as an automatic lamp.
As you know its resistance changes according to light. So if you connect it to a voltage divider circuit like shown below then it will divide the voltage according to light present.
You can see that I have created a voltage divider circuit using LDR just by replacing the R2 with LDR. This way if the light incident on LDR changes then the output voltage of the divider will also change. So I make the voltage to be proportional to the light.
Now you can feed that data to any microcontroller (Arduino) and let them make decisions. For example on the Arduino board, there are some analog input pins (A0-A5) through which you can take the input of the voltage divider. These ADC (analog to digital converter) of Arduino are of 10-bit. So it will represent the 0 volts as 0 and 5 volts as 1024. Let’s see that.
This is the code for it.
int LDRval;
void setup() {
  Serial.begin(9600);
}

void loop() {
  LDRval = analogRead(A0);
  Serial.println(LDRval);
  delay(1000);
}
Let’s make an automatic night lamp using this circuit.
Here is the code.
int LDRval;
int Lamp = 3;
void setup() {
  Serial.begin(9600);
  pinMode(Lamp,OUTPUT);
}

void loop() {
  LDRval = analogRead(A0);
  Serial.println(LDRval);
  if (LDRval>900){
    digitalWrite(Lamp, HIGH);
  }
  else{
    digitalWrite(Lamp, LOW);
  }
  delay(1000);
}
IR proximity sensor
This is another most popular sensor in electronics. It is used to detect any object in a specified distance range. It uses infrared light to detect anything. This sensor has an IR emitter LED which emits the IR light and one IR receiver LED which detects the IR light. When an object comes in front of the sensor then IR light incidents on the object and reflects. IR receiver LED then detects the reflected IR light and creates a voltage proportional to the light intensity.
Suppose that the object is located away from the sensor then the intensity of reflected light will be low and a low voltage will be created across the receiver LED. So the voltage is proportional to the object distance. You can set a minimum threshold on which the sensor reacts using a potentiometer. Here is the circuit.
You can use this sensor with Arduino and detect any nearby objects. This is what a proximity sensor looks like.
PIR motion sensor
PIR sensor is very useful for security purposes. Here PIR stands for passive infrared. This is a passive device because it doesn’t need the power to detect motion but it uses external energy to do that. This sensor consists of a pyroelectric sensor to detect the heat energy present in the form of infrared. Any living body emits infrared light.
PIR sensor also consists of a fresnel lens which focuses the light and increases the range of detection. It has two potentiometers, one for adjusting the time delay and the other is for the sensitivity. It also has a jumper to set the trigger mode. The first trigger mode is the non-repetitive type and the other is the repetitive type. In repetitive type, it triggers continuously until anybody is moving, and in non-repetitive type, it triggers only once even if anybody is still moving.
Now let’s see its interfacing with Arduino. Although you can use it even without any microcontroller.
Here is the Arduino code.
int PIR = 3;
int lamp =4;
void setup() {
  pinMode(PIR, INPUT);
  pinMode(lamp,OUTPUT);
}

void loop() {
  if(digitalRead(PIR))
    digitalWrite(lamp, HIGH);
  else
    digitalWrite(lamp, LOW);
}
There are many more light sensors but now you have understood the basic principles of those sensors.
Sound related sensors
Sound detector sensor
This sensor is used to detect sound (like clap sound if you are trying to control anything with your clap). The main component of this sensor is the simple microphone. The microphone detects the sound and gives us an analog voltage. Then you convert this analog voltage into the digital signal if the analog signal is more than a threshold value. You can adjust the threshold using a trimmer. Here is the circuit.
This is the Circuit of the sound detector sensor. Now have a look at how it works.
You can now use the digital output of this sensor to trigger an event when a noise is detected.
Ultrasonic sensor
This is a very useful sensor in electronics. It is used to measure the distance of an object facing it using ultrasonic sound waves. It has an ultrasonic transmitter and a receiver just like a proximity sensor. The transmitter generates the ultrasonic sensor and the receiver detects it. When the transmitter transmits the sound and any object is in the way of sound then sound gets reflected and returns. This returned sound then gets detected by the ultrasonic receiver. Then we calculate the distance using the time taken by the sound to return.
As you can see that it has only four pins from which two are power pins and the other two are echo and trig (trigger) pins. On the trig pin, we give the trigger to generate the ultrasonic sound and using the echo pin, we detect the returning sound. Let’s see its Arduino code.
Here is the code. I have commented on every code I have used.
int trigPin = 2;
int echoPin = 3;
long duration; // variable to store the duration of sound wave travelled
int distance; // variable to store the distance

void setup() {
  pinMode(trigPin, OUTPUT);
  pinMode(echoPin, INPUT);
  Serial.begin(9600);
  Serial.println("Ultrasonic Sensor Test");
}
void loop() {
  digitalWrite(trigPin, LOW);
  delayMicroseconds(2);
  // Sets the trigPin HIGH (ACTIVE) for 10 microseconds
  digitalWrite(trigPin, HIGH);
  delayMicroseconds(10);
  digitalWrite(trigPin, LOW);
  // Reads the echoPin, returns the sound wave travel time in microseconds
  duration = pulseIn(echoPin, HIGH);
  // Calculating the distance (Time x speed of sound(0.034 cm/s))
  distance = duration * 0.034 / 2; // Speed of sound wave divided by 2 (go and back)
  Serial.print("Distance: ");
  Serial.print(distance);
  Serial.println(" cm");
  delay(1000);
}
Temperature based sensor
Thermocouple sensor
This is a temperature sensor. Thermocouple sensors work on the Seeback principle. Seeback principle says when two different types of metal joints and put at different temperatures it creates the potential difference between other ends. This potential difference is minor and something doesn’t enough to work with microcontrollers. So there is a module available in the market which comes with a built-in amplifier that amplifies the potential difference. That module is called the DHT11 module and it can also measure the humidity in the environment. Now let’s see the Arduino connection and code for the DHT11 module.
Let’s see the code. In the code, I have included the DHT11 library. You can add then by going to sketch→include library→manage libraries and then search DHT by Adafruit.
#include "DHT.h"

#define DHTPIN 2

#define DHTTYPE DHT11

DHT dht(DHTPIN, DHTTYPE);

void setup() {
  Serial.begin(9600);
  Serial.println(F("DHTxx test!"));

  dht.begin();
}

void loop() {
  // Wait a few seconds between measurements.
  delay(2000);

  // Reading temperature or humidity takes about 250 milliseconds!
  // Sensor readings may also be up to 2 seconds 'old' (its a very slow sensor)
  float h = dht.readHumidity();
  // Read temperature as Celsius (the default)
  float t = dht.readTemperature();
  // Read temperature as Fahrenheit (isFahrenheit = true)
  float f = dht.readTemperature(true);

  // Check if any reads failed and exit early (to try again).
  if (isnan(h) || isnan(t) || isnan(f)) {
    Serial.println(F("Failed to read from DHT sensor!"));
    return;
  }

  // Compute heat index in Fahrenheit (the default)
  float hif = dht.computeHeatIndex(f, h);
  // Compute heat index in Celsius (isFahreheit = false)
  float hic = dht.computeHeatIndex(t, h, false);

  Serial.print(F("Humidity: "));
  Serial.print(h);
  Serial.print(F("%  Temperature: "));
  Serial.print(t);
  Serial.print(F("°C "));
  Serial.print(f);
  Serial.print(F("°F  Heat index: "));
  Serial.print(hic);
  Serial.print(F("°C "));
  Serial.print(hif);
  Serial.println(F("°F"));
}
If you get an error saying “adafruit_sensor.h no such file” while compiling then go to library manager again and search “unified”. Scroll down the results and install the Adafruit unified sensor. Now let’s see the simulation in proteus.